We are not face painting experts by any means, we just want to give your our face painting tips in the hopes it’s useful to you and you can have fun face painting for kids.
Over the years of youth ministry, library work, camping, and more we have had our fair share of children’s faces eagerly awaiting paint. Face painting never fails to please the kids and we have used it many, many times for all sorts of events. At Halloween we pull out our knowledge and do a bit of work on the few kids in our world. We “finish” their costumes with a complete face and then are ready at the end of the night with a few great makeup wipes.
Today we want to give you those face painting tips and tricks we’ve learned over the years.
We’re also sharing a couple of “full-face” looks that you can tweak and adjust to match a few costume ideas. These full faces have been made with the “cheaper” face paints that are easily grabbed at the costume store. We also showed you some additional face painting tutorials for beginners that are simpler and faster and made with GOOD face paint. You’ll see the difference. That brings us to tip number one…
- Use good face paint.
Our number one tip is to spring for the better face pain like Snazaroo Face Paint. We are big, giant fans of [easyazon_link identifier=”B001GRXC0G” locale=”US”]Snazaroo[/easyazon_link] face paint. It is easy to use, doesn’t leave rashes (most kids will absolutely react to the cheaper paints after a short period of time!) and washes off nicely. Alternately, you can try making your own face-paint. We haven’t tried it ourselves but have heard lots of people that have been happy with it (of course my Pinterest face painting board is a great place to start!)! - Go big.
Many people make the mistake of starting their face painting attempts with smaller designs on cheeks, thinking that they will be easier to accomplish than the full-face options. They are sadly mistaken. The smaller the image, the more detailed and concise you will need to be in your lines. A flower on the cheek is a hundred times harder to make than a full-face flower. A soccer ball on the cheek is harder than an entire superhero on the whole face, simply because of how concise your lines need to be on that smaller scale. So if you’re just starting out, go big. Or, be sure to use really, really good brushes! - Simplify your color palette.
Sure, a butterfly with five different colors can look really cool. But more often than not, it will turn into a hot mess. You are probably better off using one or two colors for your butterfly/monster/animal and having it be more simple than if you try to include too many colors. The colors, when not properly dried and defined, blend into each other and make a mess. So if you do use multiple colors, be sure you let them dry completely in between applications. We highly recommend using a black to define lines, and then one more color. That’s it. At least until you become more experienced. - Watch the eyes. When we look at photos of awesome face painting skills on Pinterest, we usually see examples that have paint all the way over the eyelids and under the eyes. And while it is true that your face paint will look best when it is so close to the eyes, we really discourage this practice. Especially with kids. It is just unwise, especially with smaller children who may be rubbing their eyes or crying. You don’t want them to get that paint in their eyes; it hurts. So be okay with face painting that is a little less epic than you saw on Pinterest. You’ll have happier kids.
- Be mindful of ages. Keep in mind the age of the child you are painting when choosing a design. Small, small children often rub their eyes making a design with a lot of paint near their eyes less than ideal. Perhaps a nose and whiskers would be better suited. Also, if your child is young and you are painting their face for Halloween night, do it as close to the time to leave as possible. And be sure to carry along some wipes if they do start rubbing. Using good paints helps ensure their aren’t tears if paint gets in the eyes, but to be sure…wipe it off if they just can’t seem to stop rubbing. A crying lion is never as cute as a smiling face!
- Simplify your steps. While many designs are enticing because of how amazing they look, watch for simple designs and faces. Children don’t really care too much how perfect you get it. But they certainly want their face paint to resemble what they ask for! There is no need to go fancy with a princess face, or a cat, or a lion. While it might be fun for Halloween night to get fancy, keep it simple (especially if you are face painting for many children). Do it simply, and well.
- Watch your color layers. Start with your base, let it dry, and apply your additional colors on top. Be sure to let the paint dry in between coats, which is why we recommend limiting your color palette in a design. Often you will use the lightest colors first and work your way to the darker colors.
- Use your fingers. Start with clean hands, always. And don’t be afraid to use your fingers to apply base coats of paint. The natural oils on your skin help spread the paint quickly and evenly.
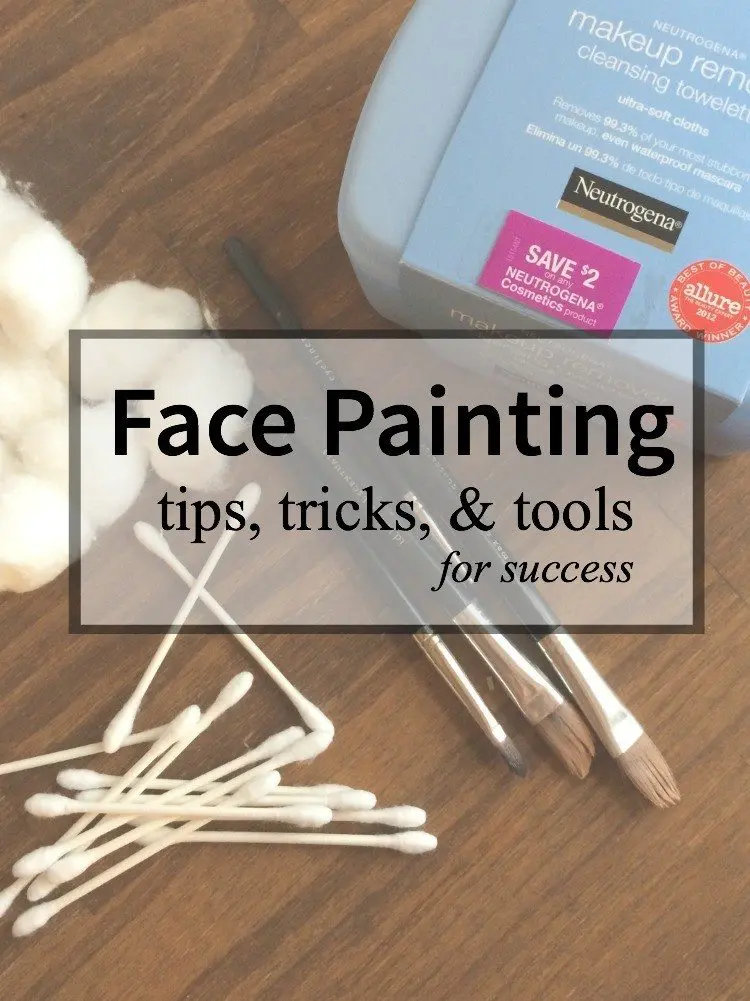
- Q-tips work great! Q-tips are great for applying face paints to many children. You can dispose of them after each child, they go on smoothly, and they can be changed with each color.
- Inexpensive paintbrushes work well. Nellie favors working with plain ol’ paintbrushes. In the library setting, art paintbrushes were readily available. They were inexpensive and easy to find. We recommend using a make-up remover wipe on the brushes in between children and for each color. You can even set them in a glass of soapy water to wash after you are finished. Or because of how inexpensive they are…toss them out!
- Use water. Many of the paints are quite thick. Feel free to dip your brush, q-tip, or whatever you are using it a small amount of water before placing it in the paint. This will help keep the consistency from being too thick (which makes it less itchy for the kids!) and spread more easily. Just be sure it isn’t so wet it drips down the face!
- Take off your face paint soon. Like we’ve mentioned, face painting can cause irritation (even with the best paints) and also has the potential to stain the skin. We highly recommend removing the paint as soon as possible after your event, and using a makeup wipe to do it. Soap and water works, but you risk getting paint in the eyes and on your clothes, and it takes quite a while to remove all the paint making for unhappy children. We went to Walmart and picked up our Neutrogena Cleansing Towelettes to do the job; they worked great. If those things can take off waterproof mascara, we knew they would have no problem with face paint! And they are surprisingly gentle, so you can use them on smaller kids. One quick wipe or two and it’s off! These are also what Nellie uses to clean her brushes between colors.

We have two full-face video tutorials below.
Again, you’ll see a difference between today’s faces and tomorrow’s due to the quality of paints we will be using. And, I forgot to include the antennae for the butterfly (you’ll see a better version tomorrow with the good paint!). Adjust the butterfly a bit to make a princess. Don’t include the antennae and body, use a smaller black outline (ending just under the eyebrows works well), and add a bit more in the way of colored dots. And sparkle…always sparkle! The lion is a basic animal concept. Go ahead and adjust it for various animals. Use a gray base and black whiskers for a cat. Perhaps gray and pink with big ears for a mouse? For young children skip the brown base coat and go straight to whiskers and ear!
Click here for a video tutorial on creating a lion.
Click here for a video tutorial on creating a butterfly.
For more Face Painting tips and tutorials :
Thank you for the tip! People at my school are counting on me for our upcoming pep rally!:)
Not can can can…dab dab dab. That’s stippling
No! Coming from a professional face painter don’t use your fingers to spread the paint. Yuck, it looks like crop. Go to Wal-Mart or where ever, but a makeup sponge (100 for like $3) and supple your paint on. That means can can can. This way you get an even coat with no smudge prints. Don’t use atop a as they make your paint have fat uneven lines. Again, buy a brush for under $2 and dip it in water and go to town. Light touch for thin lines, more pressure for thicker lines. Then spend a few minutes googling how to videos of what you want to paint. Just because you’re a beginner doesn’t mean it has to look like it!
You probably should have consulted with a professional before this article. Yes there are professionals who use safe tested paints (never homemade, not safe) , never ever fingers, best way to take off face paint, warm water, liquid soap and washcloth. Many children can have reactions to wipes, much less makeup remover wipes. Use very good brushes and that can take work to next level. Multi Multicolor paints are available to add dimension to simple designs.
Thanks for these ideas…haven’t facepainted in ages and just promised to do so Saturday at my church’s Fall Festival!
Please consider using SPONGES and BRUSHES rather than fingers and swabs. Your design will look much better and not so much like finger paintings. There are countless videos of simply to do designs that will be much more pleasing and attractive than the ones shown here. Please consider researching a bit more on this topic before giving advice to others. Meaning well does not make up for lack of research and accepting advice from professionals who are very willing to help.
Thanks! We love how simple they are!
These make up looks are awesome! Thank you! #client