If you have been following NellieBellie on Facebook you have been aware that I have been neck deep in a revamp of my hallway. I knew that we would be taking up the carpet that was there. But, what to put down…I had no idea. Cheap flooring is hard to find, and often not very attractive. DIY cheap flooring next to impossible! So, I turned to my binder of diy ideas that i had written down over the years. I remembered that I had an idea months ago of making a floor from lath. After talking over the logistics of yet one more of my diy ideas with Nate, my cheap flooring came to be…DIY lath floor.
And this is what we have now after this diy cheap flooring project…
 [call_to_action link=”https://www.pinterest.com/pin/119626933832996523/” button_label=”Pin and Save!” rounded=”false” btnsize=”medium” color=””]
Save this flooring project idea for later!
Share this idea with your friends and save it to your board for later use.[/call_to_action]
Right?!?? Can you believe that? I am soo excited about this project. The best part? The cheap flooring cost me…
Cost breakdown…
- $14.00 for the wood.
- $35.00 for the paint (it was fancy pancy because I wanted texture and super strong!)
- $28.00 for the threshold thingys. ( I needed 4 of them suckers)
Seriously people. I spent the most money on stuff other then the floor itself. How is this possible??? I’m a cheap flooring whiz, if I don’t say so myself!
Let me show you how this diy project went. You might want to try it!
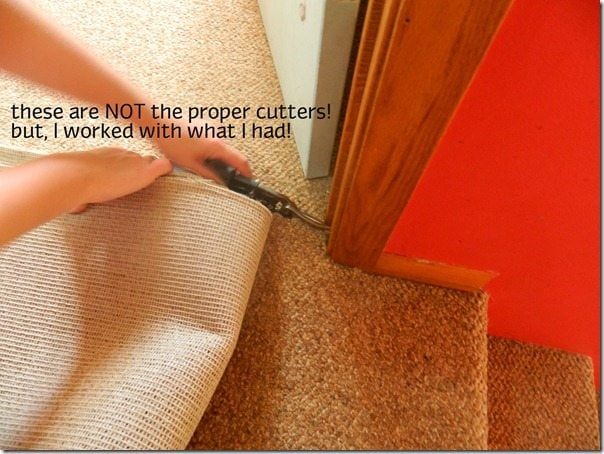
- You need to remove the carpet. This is tough. I skipped my workout that day and did this instead. Okay, for real…I don’t have workouts. But, I skipped my workout that I thought of doing.The trick is at the bedroom seams. You should have a seam from when they laid the carpet. Hopefully, you can just pull it apart nice and easy. If not, pull out the cutters and cut nice and straight!
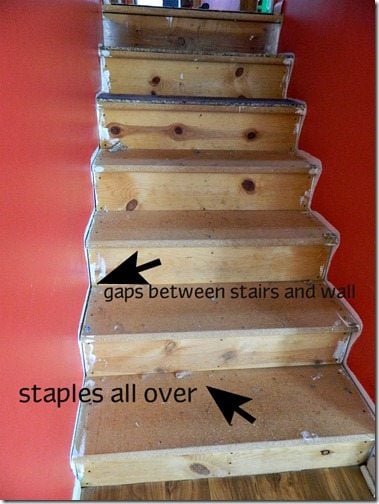
 2. Take up the stairs and the carpet pad. Watch out for the spiky things along the wall edges. Those things are NASTY!! You will have staples EVERYWHERE! And gaps between the stairs and wall (if you are doing stairs)
So, enlist some help to take turns taking out staples. You cannot forget a staple. They need to come out!! Your feet will thank you. Or your butt (no really, Nate totally sat on a staple. Is it wrong that I giggled?)


Good tip! Although, I will say that the porch paint we used was crazy strong stuff!
I would sand it, and then pour that polyresin stuff on it. That stuff makes it pretty much indestructible.
I would love to see a picture of how your floor looks!
No, I didn’t do it down the stairway. I used a solid wood cap for the stairs and painted it the same color. You can see a peek of it here… https://www.nelliebellie.com/my-hallway-reveal-epic/
Did you do the lath down the entire stairway? I love what you have done, it has inspired me to replace my lanolium floors with lath in our hallway! And the carpet on our stairs. Just curious if you posted or have any photos of the stairs.
Good luck! Can’t wait to hear how it goes for you!
When you nailed it down do you do it diagonally like traditional hardwood or did you staple/screw through the top?
We got ours at Menards. I believe they are available at most lumber yards as well.
it’s brilliant. Where did you buy your wood laths? Thanks.
I have seen on Pinterest where some have used Liquid Nails or some other super duty glue to glue down wood floors. I will be attempting this as we have concrete floors under our carpet.
that is a BRILLIANT idea!!! wow- congrats.
Um…we have absolutely no idea! Not the answer you wanted…but hey, honesty is better than telling you it will work and then finding out later we are liars, right?
Could this be glued to concrete slab?
Great idea for floors in trailors, light weight and mommy can do it. What do you recommend, before we moved in, the lamenant floor was is actually the subfloor, so lath or reclaimed pallets for floor to place over after removing lament tiles?
What kind of paint did you use? How is it holding up? Looks great!
We don’t remember the exact number, but they were just basic finishing nails that fit in our nail gun…
What type of nails did you use to keep the wood from splitting? We are doing our floors with the Lath and we are afraid that it will split. My father in law has a nail gun fo us to use. We just need to know what size nails.
There’s actually a link at the bottom of the post to show how it held up. I could get the link for you…but to be honest, I’m too lazy today :)
How does it look now??? I want to try this but I want to see how its held up!
Wonderful work!!
WOW! This is such a huge difference. Love the color you chose for the floor. It really looks great!
Hi! I was tickled pink when I saw you did this! I did something very similar to my entire house (except the kitchen, which I still want to do!) I work at Home Depot, so I had one of the guys rip bunch of plywood (quarter inch I believe) into twelve inch planks. I staggered them and screwed them down with deck screws. I was looking for an “Old Farm House” look, and that’s exactly what I got!! I painted them white with porch and floor paint, and they have been down for about 8 years, and get better looking the more beat up they get. And trust me, with 3 cats, a puppy, a 16 year old and a husband that works outdoors every day, they take a beating!!! I just mop them like you would a regular floor because the porch and floor paint is made for outdoors and can take the moisture. Thanks for sharing that, now you lit a spark under my butt to do the kitchen!!! And my husband will thank you for that!! Have a great day!!!
That’s a great idea! I love using lathe. It is time consuming but it turns out such a cool end result!
I used lathe to cover the wall under the bar at my sons house. We love how it looks! We stained his and applied it to a piece of plywood for the base and then installed the plywood on the upright wall. After it was screwed to the studs we applied the final strips of lathe to cover the wood screws . Inexpensive but time consuming. :) However the end product was so worth it. I got my inspiration from a bar front at a Starbucks.
It is holding up beautifully for us! I am fairly certain the super paint helps, but…we are loving this!!
My husband and I are OBSESSED with this!! Mind if I ask how it’s holding up now that you’d had it down for a while? We’re thinking about putting the same down in his man cave. It won’t be a super high traffic area like your is, so I think it’ll be fine. Just wondering :)
Go Girl! Spectacular!!! Love cheap and giving anything a try.
some questions answered are in this post… https://www.nelliebellie.com/lath-floor-hold/
It was fairly high traffic. In our hallway to bedrooms.Not as high traffic as a kitchen or living room. But, fairly.
Thank you!! I love that color, as well!
Last question in this post. Thank you!! Me too! https://www.nelliebellie.com/lath-floor-hold/
Looks awesome! What paint did you use??? I love love loveeee the color!
The color of the floor against the white walls is “eye candy.” Great idea!
Did you give it a sanding before painting it? And I was also wondering, do you have it in a “high traffic” house? I currently have carpet and dogs, they are all trained but I still can’t figure out how to teach them to wipe their own paws before coming in. Lol oh and kids too so just wondering how it would compare for wearing issues. I’m totally thinking of doing this in my kitchen, dining and living room areas !! Thank you for the tutorial. Awesome idea. I’m totally gonna try it !!
Do you have a facebook page I love this flooring
On the face. I think if you were to nail on the edges there would be splitting?
Did you nail the face of the boards or the edges?
Thank you…I do too!
what a transformation. Congrats! I so love the color, very cool to the eyes :)
I’m so glad to hear I gave you some inspiration for getting fabulous without costing alot of money!
Thank you so much for this tutorial. I yanked up some stair carpet (after unsuccessfully trying to patch a problem area). I was not planning to do that nor suddenly find myself needing to spend a fortune to have new wooden treads or some other option put in. I was thinking of doing lath strips, since they are so easy to cut. I thought I would stain them. As you said, it is a cheap solution and if it does’t last – no big deal. It was great to hear they have held up.
It is holding up fantastic!! I might give it a quick coat of paint. Yes…I have seen that. No, I don’t. Truthfully…this floor is so wonderful that I wouldn’t feel the need to try something else!
Looks really pretty. How’s it holding up a year later? Have you seen the tutorial about using plywood ripped into strips to create a floor? Any experience with that?
I didn’t put space between the boards. Well, I take that back…I stuck a penny in between each one (the vertical way). We used a nail gun and yes…sanded them afterwards!
Hi love it ..I think Im going to do this ..question “ dont you have to put space between the boards? I thought you had to ..what nails did you use “ nail gun or a hammer” did you glue them down first and I am sure you sanded after …great I want to do it too….sally
Hi love it ..I think Im going to do this ..question “ dont you have to put space between the boards? I thought you had to ..what nails did you use “ nail gun or a hammer” did you glue them down first and I am sure you sanded after …great I want to do it too….sally
That is incredible! I am so pleased to hear it…and love your 7 coats of polyurethane AND the strips of color. What a fabulous idea! Thank you so much for letting me know of your success. And congrats on that hard work!
We were inspired by your lath flooring months ago and decided to give it a try throughout our mobile home. We tore up carpet, took out a bathroom, replaced some subfloor, and then laid the floor. We used staple guns and it went down pretty fast. We included some holey pieces and different colors of the strips (red, grey, etc). We sanded it smooth and added 7 layers of polyurethane…. BEAUTIFUL! Everyone who walks in loves it. Thanks for the cheap inspiration!
AAAAAAMMMMMAAAAAAAAAZING!!!!! Thank you sooooo much for saving me a bundle on my master bedroom build!!
Wow! What a beautiful transformation! I had not even heard of lath…thanks for sharing what it is!
this is a great use of inexpensive wood. awesome look!!!
Hi Carla!!
These were painted with a specialty paint …Porch and Floor by Dutch Boy with primer/sealer. This is a very, very sturdy paint. It is for porches. And, I love it.
Love that floor! Looks all gappy and old.
P.S. thanks for commenting!
Your new floor looks great! I like the color that you chose.
Looks great! I’m sure you are glad it is finished :) Lots of work huh?!
I am in love with your new floor! My favorite color and my favorite budget, cheap! Fabulous!
Wow wow! That is awesome! I wish we had a house. *sad face* Great job! :)
Looks great! Did you prime, paint and then seal the floor? Did you use floor paint like the kind for outdoor wooden porches? If not, what kinda paint did you use?
Beautiful boards, Nellie, such a great color! It looks like award season in Blogoland, so please come over to receive the Dardos Award!
Brilliant…gorgeous…I want to try this!
You picked the perfect color for the cottage look. You and your helpers did good, looking forward to the reveal.
Bliss
Good job, girl! Beautiful color. Thanks for answering that lathe question….I had no idea what that was.
Wow, girl you got it going on! :) Great project!
Love, love, love the color and the cost can’t be beat! I asked for lath at the local big box store and got a tilted-doggy-head “huh?” Oh well, I’ll keep looking and in the meantime drool over your floor :)
Your floor is amazing! Wow…I love the color. Megan {Our Pinteresting Family}
looks great Janel! I love a pretty cottagy floor. :)
Believe it or not…I didn’t sand the lathe. This stuff was so great. And I used a very thick paint that eliminated all need for sanding. But, you are right…it is a step that should probably be done if necessary!
Lucky you finding all those bundles of the same widths! Although staggering widths might be another cool look. Really love this project – when did you sand the lathe? before or after the install?? Have a great week!
GET OUT! Wow, that looks so beautiful – well done girl!
That is soooo awesome!
He’s a dork. He said, “You want blue floors?” While I love your color choice, it wouldn’t work in my house. I said, “No, goofball, I want to try the technique!” LOL
Wow! This is truly amazing. Great work!
See potatoes and aqua floors. It’s meant to be :)
Thanks!! Good luck on getting your husband over the phase :).
Holy crapola!!! Those are AWESOME!!! And EXCELLENT Tutorial! I’m leaving this on my dear husband’s FB page, so he can get over his “not again” phase before he gets home from work!
Kristy @ Shona Skye Creation
http://shonaskye.blogspot.com
You go girl! It’s simply amazingz!!!
Thanks so much!!
Holy moly girl! I LOVE it!!
Thank you!! You aren’t late…it was just added yesterday!! You are right on time! Thanks for noticing!
This looks amazing, Janel! The color is fantastic and the price is even better :) Also, I may be a little late in noticing, but I love your new picture… you look beautiful!
absolutely! Milking this one. Really, I’m still working on pictures.
More with the teasing? Well.. I LOVE the color, It’s like a tropical vacation :))))
some day we will sit and chat right on that floor. why bother with furniture when we can use the gorgeous floor :)
Good Gosh Holy Smosh – this is AMAZING~!!!! Love that Floor…one day I will come over and dance my feet across it- One day I will! Great job!!
Thanks Nat!! I love that color too…so pretty!!