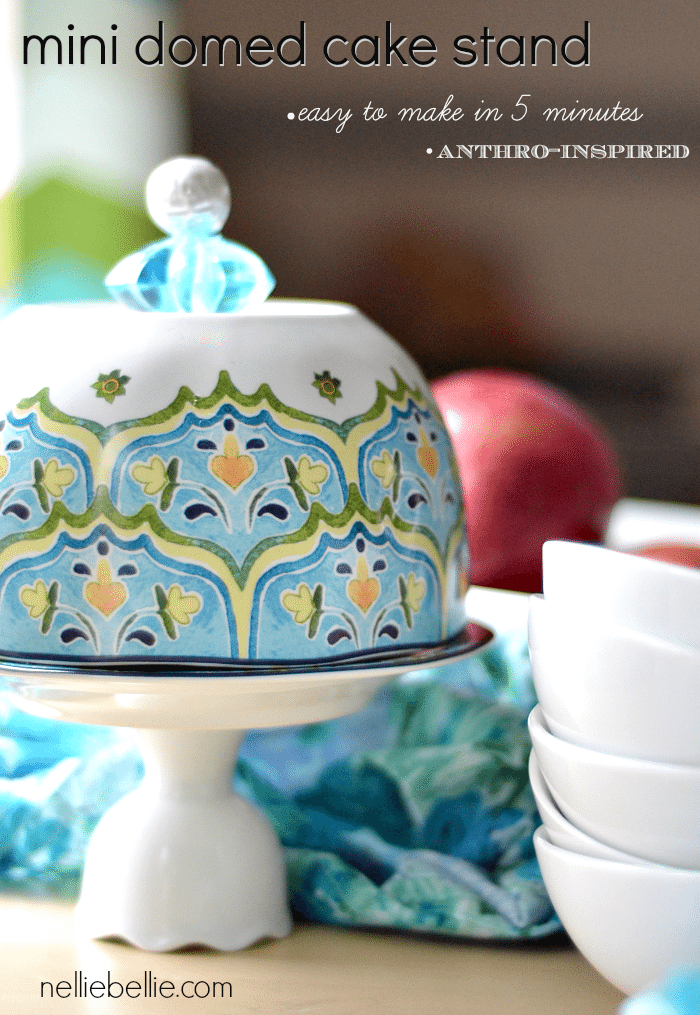
There are projects that I am so very excited about that I forgo important work so that I can make them. This mini domed cupcake stand is one of them. Like the diy ring dish tutorial I recently did for a Christmas gift, this cupcake stand is so quick and easy it’s downright shameful. So of course, I have to share the simple steps for how to make a cupcake stand (or mini-cake) with you so you can make one of your own!

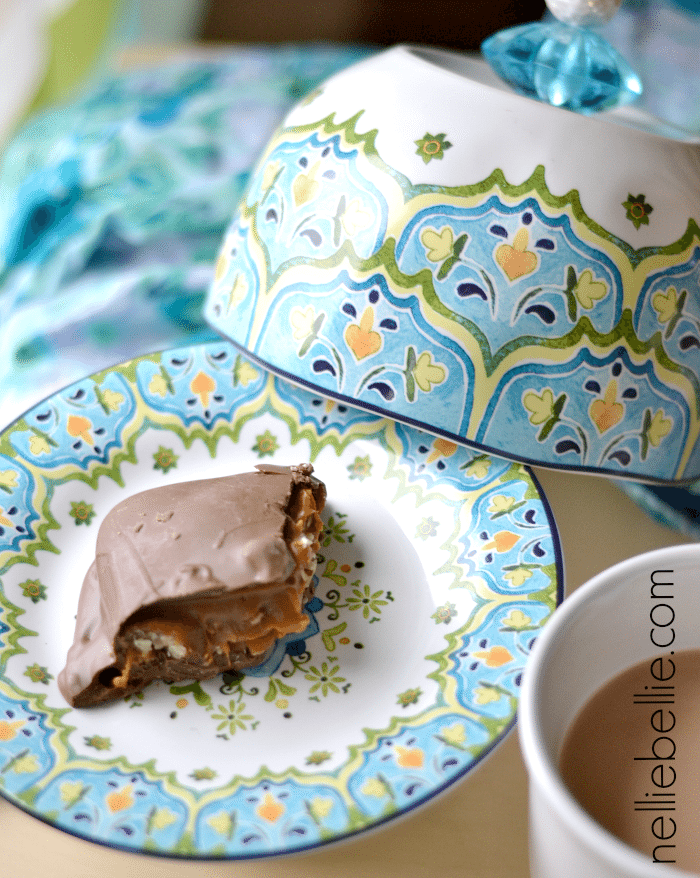
This will quickly become your go-to gift.
Many wonderful tutorials for creating your own cake stands exist on the interwebs. But this domed version is a special twist. Of course, the mini size of this stand (don’t worry, you can do a full version!) adds to the adorableness and is perfect for cupcakes. A cupcake stand would be a gift that most anyone would be pleased to receive especially if it comes with a cupcake! Honestly though, I’m keeping this one. I love it!
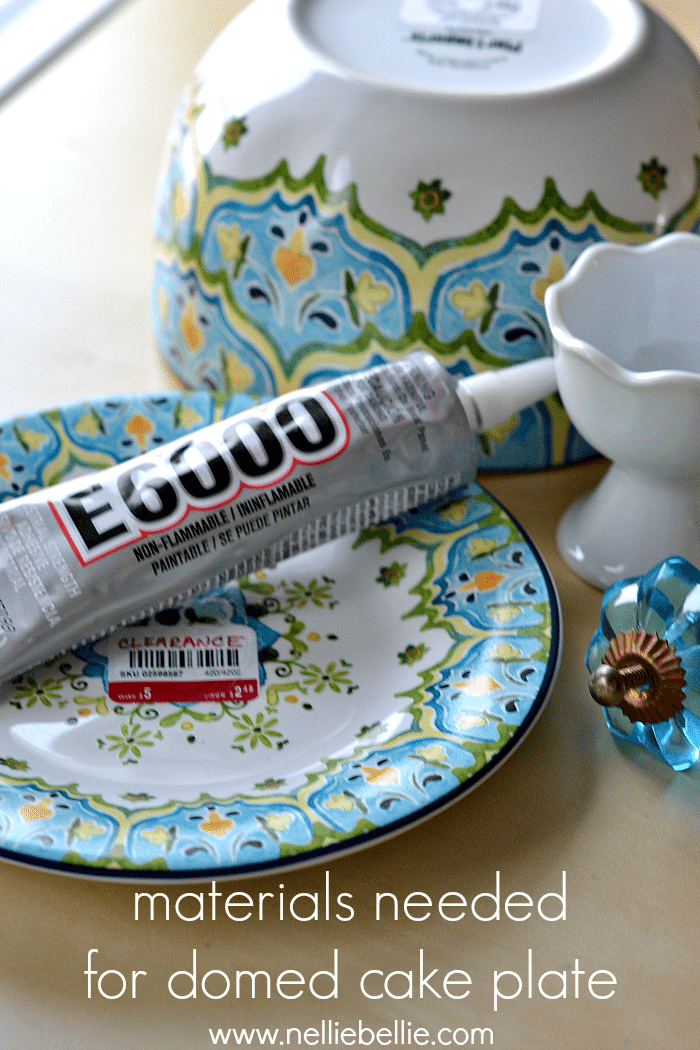
Materials needed for cupcake stand:
- bowl
- small plate
- small cup, egg cup, sundae dish, or candlestick
- large bead or knob
- E6000 or similarly strong clear, waterproof glue
This is when you splurge on that beautiful bowl and plate set you saw, or the gorgeous hand painted bead you love. I went to a local store for my dish set and had a hard time choosing WHICH set to get. You could try your local thrift store and see what you can find.
I’m crushing on this set on Amazon (even wondering if that much could work in place of the egg cup. hmmmm…)
Note: A drawer knob will work for the top if you can remove the screw and it will still look nice. Otherwise, a large bead works well.
Because you are gluing these pieces together try not to get dishes with scalloped edges, you want a nice clean edge to put glue on. My scalloped edged dish was at the bottom (non-glued) of my dish, not a problem!
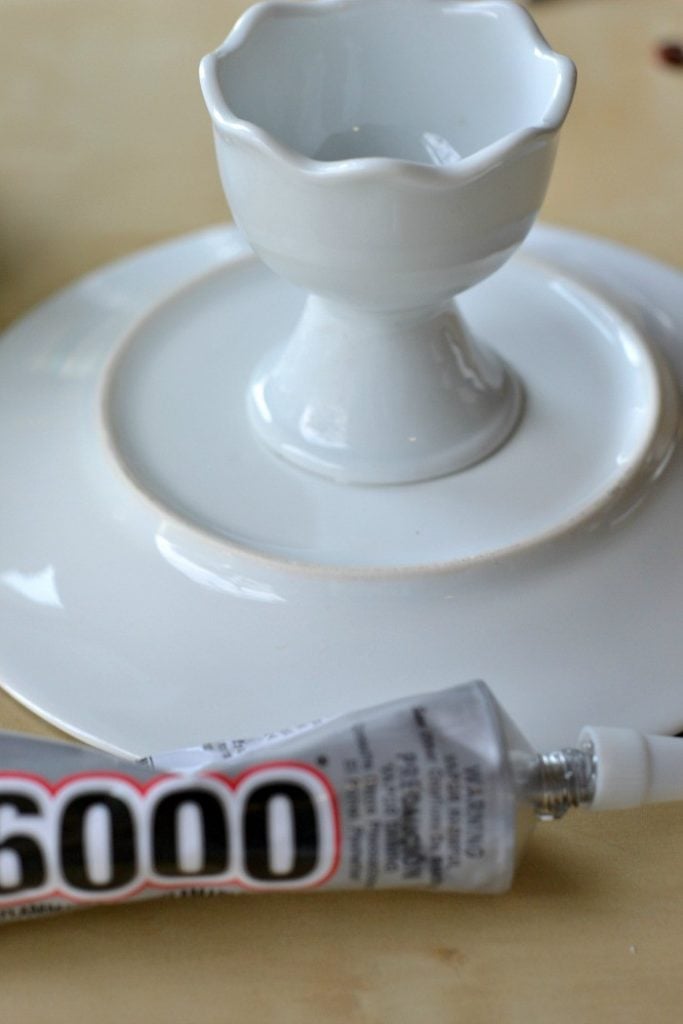
Directions for cupcake stand:
- glue the parts together.
- let dry.

Be sure to place the right side things up and the down side things down. Try to keep your glue from being to gloopy (yes, I just said gloopy) and just wipe off any excess before it dries completely. If you like, paint the bottom of the bowl with white porcelain paint to cover any labels that might be printed. Or, choose a large enough bead or knob to cover. Whether you need to make cake stand knobs or not, just be sure the top looks clean. This mini domed cake stand project was inspired by the version Anthropologie sells on their site for a whopping $148.00.
My dear friends, I love you but am not paying $148.00 for a project that cost me $12.00 (and that seems a lot!). I love you enough to say no and to give you a quick and easy alternative! Have fun making one, or two, or a bunch of these as fun gifts for friends and loved ones!
And as usual, if you don’t feel like you want to make cake stand, you can always buy one. Really, that’s allowed! You could get the awesome Anthro version, but if you are okay with a simple and cute mini stand, without all the fuss, this one on Amazon might do the trick.
A few other quick and easy crafts you might be interested in…


That is super sweet and I love it! Imagine when he is 22 years old and still using that, precious!
I’m thinking of making one out of melamine dishes. The plan is to put a single cupcake out for my son’s birthdays. he’ll be three next month and I think it would be a nice tradition to use the birthday stand every year..every birthday he’ll wake up and know he’s got a cupcake for breakfast.
First, try to pick a bowl that has smaller writing. Second, a white porcelain pen paint is a quick easy way to hide it if necessary. However, the use of the large knob absolutely did a great job hiding that. But again, mine was probably fairly small writing. I did mention these steps in the post, btw. It’s a good question!
How do you hide the writing on the bottom side of the bowl that you use for the dome ( we all know that the writing is there ) . Glueing a bead isn’t going to hide that ????????
A bigger one would be a bowl and plate maybe? Or candlestick. And wouldn’t this be great for a buffet table of desserts :).
I love this idea! This is really cool! I would love to see it bigger than a cupcake. I think it would be neat to just get white ones and hand paint them. That way you could tell entire stories with many small ones or in one large cake stand.
Unfortunately, we don’t actually know what works. Sorry!
Do you know what I can use to remove the E6000 from a plate stand I made? The plate cracked and I want to separate the candlestick from the plate. I’ve not found anything yet that works. Thanks in advance. Love your ideas.
Aren’t those dishes pretty? And this cake stand is super easy to translate to a bigger one! Hope it works out well for you!
I want to use this as a template to make a bigger one for myself. That is a pretty pattern for the dishes.
Hey Ladies! Yes, grammar is great. A friend & I were just discussing how much punctuation can make a difference as we planned a label for our Homemade Balm Bomb (heals & protects for everywhere- but sex v.s. Heals, protects from everything but sex). We had a good laugh at that! Aaaanyway, as for your blog….I don’t care if you text it in abbreviations…it’s sooo gooood I would figure it out!! Just look at all that fantastic eye candy (aka pictures). Anyone who might criticize your spelling or grammar when you’re great enough to share all your SuperFantasticDyNoMite ideas with us doesn’t deserve to get to see them! We’re not here for the English lesson; Thank You very much!
Glad you like it! And it does make a great Christmas gift. And those bird feeders sound just adorable!
Love the mini dome dish. I think I will try it as gifts. Maybe even the Christmas bazaar. I also purchased
D this summer a bird feeder that was made from glass bowls and glass drinking glasses. It is beautiful. The lady was also selling tea cups as bird feeders. Amazing ideas.
oh yes, we agree. The comment about grammar was in response to one of the comments from our readers making a mistake in it’s versus its. We were just letting her know we didn’t hold it against her. It wasn’t a general comment directed as a whole. And, I do agree about grammar. And, I am not the best in the grammar and spelling department. I try, but it is difficult for me. That is why I brought on Lanet who is has English in her resume background. She has a big job helping keep the conversational tone and still have good grammar. Poor girl! Have a great weekend!
Grammar and spelling are never optional if you want people to read what you’ve written. Converational, informal writing is fine in a blog. Seriously, there is a large segment of DIYers who know grammar. Don’t alienate them, and grow your audience.
This is a pretty plate and bowl. I know cake stands from Dollar Tree are all over Pinterest, but they don’t have the dome which is why I didn’t bother. This changes things.
GRAMMAR is NEVER optional :0
Just adorable! I will have my eye out for the perfect dishes to create one (or more) of these. What perfect holiday gifts with treats tucked inside!
Absolutely beautiful! I love it!
Proper grammar is optional on the internet…:)
Oh! What would be darling – make one with children’s porcelain dishware.
*determine ITS height, not it’s (lol)
A regular sized (say, 10 to 16oz) bowl and salad plate makes a mini. That’s pretty easy to imagine, I think, as far as size of the mini. Of course, the base plus bowl depth, plus topper would determine it’s helght. Thanks so much for this great idea! I think my mom will really love this and might even hire me to make her a few to sell!
We think so…but we haven’t made the larger version…
Love this! Will the glue hold the bigger version well? Say for standard sized bunt cake maybe? This says mini, what size is mini? Want to make for a wedding gift. Thanks!!
Adorable…love it! Great tutorial!
Accidental finds on the internet are the best kind! And these would be great Moms Day gifts!
Supper cute to go with a little girls tea set found by accident but will def use this maybe i will even have my scouts make thier moms one for mothers day
Isn’t that the worst? Finding something you love, then realizing you can’t/shouldn’t buy it? We hate that. And it happens ALL the time. Glad this will help you get what you wanted at a price that makes sense!
I LOVE this sooooo much!!! I am glad you didn’t spend $148! :D I’ve wanted a cake stand for forever, but I either don’t like what I find or they’re $$$$
I love this idea…..It looks fantastic and would be so easy to make. It can be customized for whatever style fits into your own decor, which is great. Pier One is one of my favorite places to shop, too!!!!
We’re so glad you like it!!! And that you found this site. It’s interesting how you make discoveries online, isn’t it?
I know this is an old post, but I serendipitously found your site through another site, and another site, etc. Surfing the web does that.
I adore domed cake plates but can’t afford the ones sold in the stores. I can make this and I think it is beautiful. Thank you for this idea….so nice.
Love the ideal will be making them for friend’s and family
You can drill a hole in the ceramic/glass. If you choose to do it that way there are a lot of tutorials online. Just google ‘how to drill holes in glass’ or something similar. I’ve done it with my husband’s drill press and with my dremel with a carbide bit from harbor freight. It is a little intimidating at first and I would start with some less-loved dishes for practice but I found it much easier than I had anticipated. Good luck!
Thank you so much!
Aren’t those dishes lovely!! We found those at Pier One.
Where, oh where, did you get those adorable dishes??? I’m in love with the pattern! BTW, I love your beautiful cake stand too:)
Good to know!! Thanks for the info. Awwww, that would be a-dor-a-ble with a cupcake!
In response to Loop, the E6000 does hold a larger plate. I have made the large cake stands (similar process) with this glue and they have held up under use and wash for over a year now. Love this mini dome idea. It’s going into my to-do list for b’day gift with cute cupcake.
That’s a great idea! We hadn’t thought of using this for Mother’s Day. Thanks!
This is so cute and pretty! I think I am going to have to make some for Mother’s day gifts. Love it!
hmmm…that’s a good question. I imagine that most of those strong glues would hold. Let me know what you find out! We would be curious!
Or maybe I should stop asking about it, and go to goodwill and buy a few plates to try my drill out on! haha
I need to make one, or 20 of these! Do you think it would be possible to drill a hole in the bowl and put a real handle on it with a washer m post and then the bead? I was thinking of using a full sized plate and ceramic mixing bowl, but worry that glue wouldn’t be strong enough to hold a large bowl?
totally brilliant! Absolutely love it!
You can use a wee bit of paint. Or, if you are lucky…your knob will fit right over the top :).
GREAT idea!! I will definitely do this! But how do I cover the. Insignia on the bottom of the bowl when I turn it upside down…and then it becomes the top? Any suggestions?
This is so cool… it takes cake stands to a higher level. Thanks for sharing and if I make one I will link back to your post for sure!
I love love this comment!!! all the !!!!!!!!!!!!!!! and the OOOOOOOOOOOOOOOOOO make it so much better than average :)
Just think of how adorable your delicious cakes would look in one of these! You go girl!
oh…what a cute idea!! That would be darling!
I know!! I agree. I figured there must be a cheaper alternative! It sure is cute, too.
OMGOOOOOOOODNESS!!!!!!!!!!!!!!!!!!!!!!!!!!!!!!!!! This is BRILLIANT says the lady that has made a 100 and 1 cake plates and didn’t think of this ingenious combination! I SOOOOOOOOOOOOOOOOOOOOOOOOOOOOO love this…getting out my E-6000 and going to have a PARTY!!! lol!!! LOVE LOVE LOVE this SOOOOOO much I can’t tell you how much! WOW! hugs…
Just LOVE this! I even have everything in the house to make it.
This is the kind of project I just love! Simple and easy to do with great results. Thanks for the awesome idea in time to make some adorable Thanksgiving table sets :)
Sheila
Seriously adorbs! I can’t believe people would pay $150 bucks for something like that! They must not have mountains of student loans debt like we do. Ha!
Thank you! Yes, simple and cute…best combo!
Thank you!! Those dishes are from Pier 1 and I love them!
Thank you!!! I love it too. It is sitting on my table smiling at me!
Love love love this!!! So cute and simple!
That is about darling!!!! I love the pattern. It’s so whimsical. Pinned baby. Adorable!!!!
This is absolutely adorable – love the bits and bobs you chose to put it together with!! Pinned!!